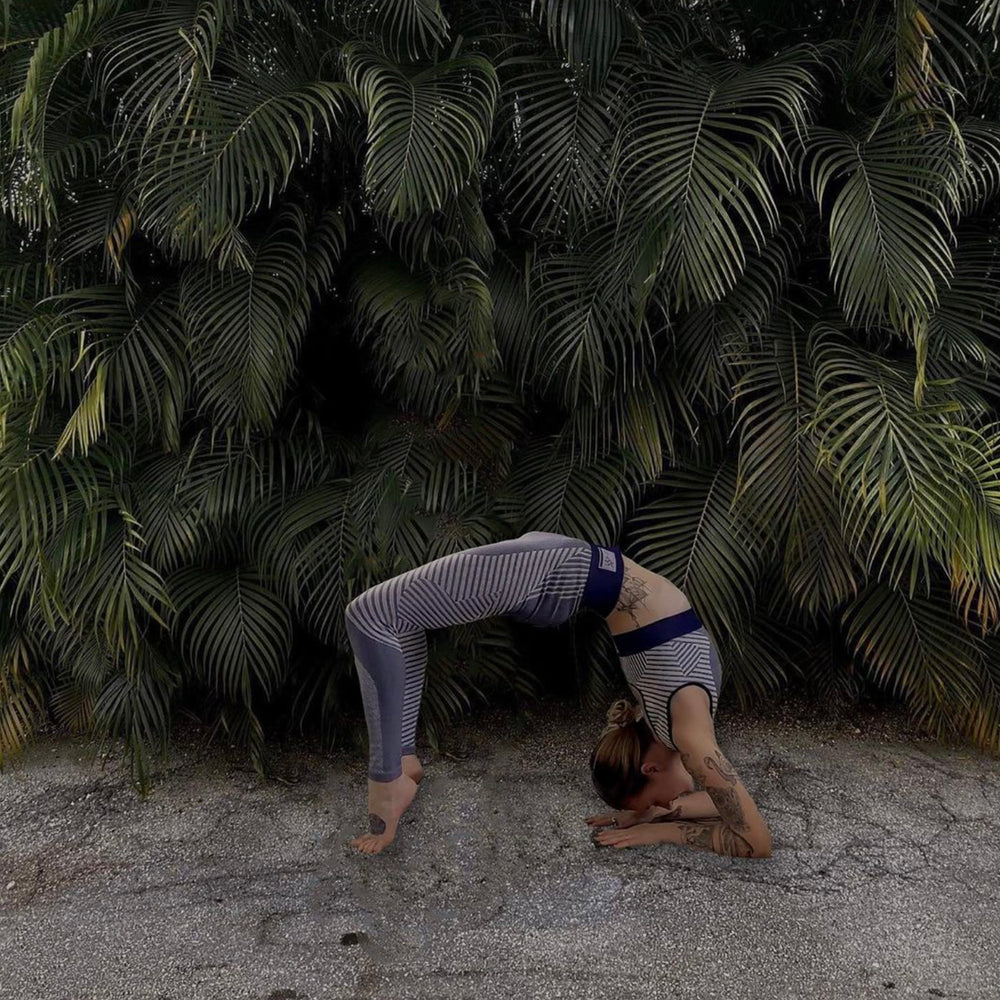
The hollowback is an intermediate-level yoga pose that demands strength, flexibility, and balance. Often seen in advanced yoga practitioners and acrobatics, the hollowback is a captivating inversion that defies gravity. Its appearance might be intimidating, but with dedication and proper guidance, intermediate yogis can safely progress toward mastering this pose.
In this article, we will break down the hollowback pose step by step, providing valuable tips, precautions, and variations to help you safely and effectively progress toward achieving this impressive inversion. Remember, consistency and patience are key when working towards advanced yoga poses like the hollowback.
What is the Hollowback Pose?
The hollowback, also known as the "fallen angel" or "hollowback handstand," is a variation of the handstand pose (Adho Mukha Vrksasana) in which the practitioner arches their back deeply, creating a visually stunning and challenging pose. It requires a combination of strength, flexibility, and control, making it an intermediate-level posture.
Benefits of Practicing Hollowback
1. Strengthens the Core: Hollowback requires strong core engagement to maintain balance and control while arching the back.
2. Improves Balance: As an inversion, this pose challenges your sense of balance, enhancing your overall stability.
3. Enhances Flexibility: Hollowback demands flexibility in the spine, shoulders, and hip flexors, promoting greater range of motion.
4. Boosts Confidence: Achieving the hollowback can be incredibly rewarding, boosting your self-confidence and belief in your abilities.
5. Mind-Body Connection: The complexity of this pose cultivates a strong mind-body connection, fostering mindfulness and concentration.
6. Improves Posture: Regular practice of hollowback can help correct poor posture by increasing awareness of spinal alignment.
Preparatory Poses
Before attempting the hollowback, it's essential to build a strong foundation with preparatory poses that target the required strength and flexibility. Incorporate these poses into your practice to prepare your body for the hollowback journey:
1. Downward-Facing Dog (Adho Mukha Svanasana): This pose stretches and strengthens the shoulders, arms, and hamstrings, which are crucial for a successful hollowback.
2. Dolphin Pose: Similar to Downward-Facing Dog, Dolphin Pose targets the shoulders and arms more intensely, helping you build strength and flexibility.
3. Plank Pose (Phalakasana): Plank strengthens the core and arms, which are essential for maintaining balance during the hollowback.
4. Bridge Pose (Setu Bandha Sarvangasana): Bridge Pose is an excellent way to improve spinal flexibility and strengthen the back muscles.
5. Camel Pose (Ustrasana): Camel Pose stretches the front of the body, including the chest and hip flexors, while enhancing backbend flexibility.
Step-by-Step Guide to the Hollowback Pose
Now, let's explore the steps to achieve the hollowback pose:
Step 1: Warm-Up
Begin with a thorough warm-up to prepare your body. Perform a few rounds of Sun Salutations or engage in some gentle stretching to awaken your muscles and increase blood flow.
Step 2: Wall Support
For safety and stability, practice the hollowback pose against a wall. Start in Downward-Facing Dog with your heels touching the wall and your hands placed about a foot away from it.
Step 3: Lift One Leg
From Downward-Facing Dog, lift one leg off the ground and extend it upward. Keep the other foot grounded and your gaze between your hands.
Step 4: Slowly Lift the Second Leg
As you gain confidence and strength, begin to lift the second leg off the ground, bringing both legs into an inverted "V" shape. Ensure that your hips are stacked over your shoulders and wrists.
Step 5: Start to Hollow the Back
Begin the hollowing process by arching your back and lifting your chest towards the wall. Imagine creating a deep backbend while keeping your legs extended.
Step 6: Maintain Core Engagement
Engage your core muscles to stabilize your balance and control the arch of your back. Your shoulders should remain strong and stable.
Step 7: Gaze Forward
Direct your gaze toward the wall to maintain focus and stability. Your head should not hang or drop.
Step 8: Balance and Breathe
Hold the hollowback pose for a few breaths. Initially, it might be challenging to maintain balance, so be patient with yourself.
Step 9: Safely Exit the Pose
To come out of the pose, gently lower one leg at a time to return to Downward-Facing Dog. Take a moment to rest in Child's Pose or Downward-Facing Dog before attempting another round.
Safety Precautions and Tips
1. Practice Against a Wall: Always start with wall support to ensure stability and prevent falls. As you progress, you can gradually practice without the wall.
2. Core Engagement: Keep your core engaged throughout the pose to maintain balance and protect your lower back.
3. Gradual Progression: Don't rush the process. Progress at your own pace, and only move on to more advanced variations when you feel confident and strong.
4. Listen to Your Body: If you experience any pain or discomfort, especially in your wrists, shoulders, or back, come out of the pose immediately.
5. Consistent Practice: Consistency is key to mastering the hollowback. Dedicate time to practice regularly and focus on improving your strength and flexibility.
Variations of the Hollowback Pose
Once you have mastered the basic hollowback pose, you can explore variations to challenge yourself further:
1. One-Leg Hollowback: Lift one leg off the wall and arch your back deeply, focusing on balance and stability.
2. Hollowback Handstand:** Progress to a full hollowback handstand without the wall, using a spotter if necessary for safety.
3. Hollowback Forearm Stand: Transition from a forearm stand (Pincha Mayurasana) into a hollowback forearm stand for added complexity.
4. Lotus Hollowback: Incorporate the lotus position by bringing your legs into Padmasana while in the hollowback.
The hollowback pose is a stunning and challenging inversion that demands dedication, strength, and flexibility from intermediate yogis. While it may appear daunting at first, with consistent practice and the guidance provided in this article, you can progress safely and gradually towards mastering this impressive yoga pose. Remember that yoga is a journey, and the hollowback is just one milestone along the way. Be patient, listen to your body, and enjoy the transformative process of exploring this captivating posture.
|